Just about everyone and their hairdresser’s granny has a Gmail account (Google’s email service). It’s free, it’s web-based so you can access it from anywhere, there are tons of applications that work with it, it (usually) blocks spam like a champ and it holds a boatload of archived email. What’s not to love? We highly recommend Gmail as an email service and if you can get the name you want, it’s a good companion account for bloggers, if for example, you’d like to keep your “real life” email anonymous.
But what if you want to present a more polished web presence? What if you’re using your website or your blog for business? It usually looks more established to send and receive email using your domain name. It carries a bit more grativas. Would you hire a realtor who’s email address was [email protected] (or @gmail.com or @yahoo.com or any other free service). You might, but that realtor would probably appear more “pro” by having an email address like [email protected], don’t you agree?
Sometimes clients will ask us to forward the emails from their website email ([email protected]) to their free web-based email address. That’s an alright solution, but what happens when you want to respond to that received email? It will come from your @freeservice.com address instead of @yourdomain.com. And that breaks the tone that we set by sending to the domain name to begin with.
So, how do you send and receive email using your domain name?
Well, you can always check your email using webmail, accessing your email via your web host’s control panel. They generally provide one or more options for reviewing your mail. Again, this is an alright solution, it’s web-based, but… ehhh, the interfaces aren’t that nice and they’re not as robust as using something like a desktop-based email program (or “client”, as they are often called, that lives on your computer as opposed to on the web), say Outlook, Thunderbird or Mail for Macs. But did you know that you can use your trusty Gmail account to act just like one of the usual desktop-based email client? You can check your Gmail and send/receive your domain email all in one convenient web-based location. No matter where you are, if there’s an internet connection, you can access your email (especially handy if you’re in a serious relationship with your iPhone or Blackberry).
Follow the steps below to make your Gmail account do more than just receive chain mail and jokes about kittens from your Aunt Edith.
Step One: Get a Gmail account if you don’t have one
You can sign up here. Pick a name that you like or that corresponds to your business or use your own name if you want. Whatever blows your dress up.
Step Two: Make sure your @yourdomain.com email address is set up.
We can’t account for every web host’s mail set-up, so we recommend contacting your host directly if you have any questions about this. But usually, you login to your host’s control panel and find the ‘email’ section. If your email account is not already set up, go ahead and do so and make sure to write down your password, especially if they randomly assign one using a bunch of crazy numbers and characters. You’ll never remember that and you’ll need it later on. If you’re allowed to choose your password, go with something you’ll remember, but be sure to keep it secure.
Step Three: Make sure you have all your host’s mailserver info handy.
This information is usually provided when you initially sign up with your host. Again, contact your host directly to get this information if you’re unsure. It’s usually something simple like mail.yourdomain.com. You will also need the SMTP information from your host; usually it’s the same as the mailserver information: mail.yourdomain.com, but your host may have something specific that pertains to their servers, so be sure to ask.
Step Four: Set up your @yourdomain.com email within Gmail.
This is where the magic happens. I’ll bullet-point things to keep it straightforward. I could yap all day.
- Log in to Gmail
- Choose “Settings” from the upper right hand corner of the screen.
- Choose the “Accounts and Import” tab in the yellow area of the screen
- Choose the “Add POP3 Email Account” button in the middle of the screen. A pop-up window should open.
- Enter your email address ([email protected]) and click “Next Step”.
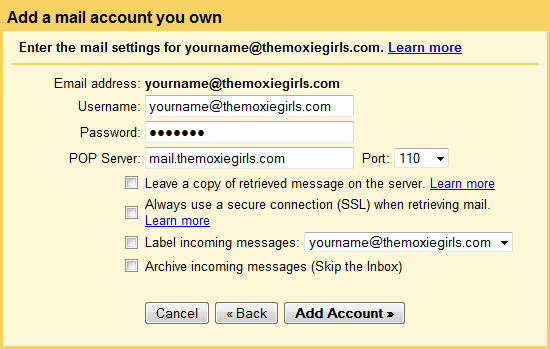
- In the next window, fill in the appropriate information. The ‘username’ will most likely already be filled in for you. Many times, the full email address is required here, as well, so if you hit a snag with just the username, enter the full email address. (i.e., instead of “yourname”, you’d put “[email protected]”—with “yourname” being, obviously, whatever the name is that you chose for your email account.)
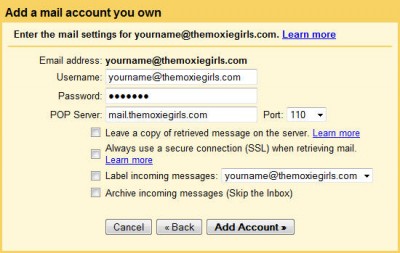
The “POP Server” field may automatically fill in the logical choice as mentioned above (mail.yourdomain.com), but if yours is something different, enter the correct information in that field. You probably will not need to change the “Port” drop-down unless instructed by your host. You can choose to leave a copy of the emails you retrieve on the server for safekeeping, but Gmail has so much server space, we generally don’t check this option. We also don’t usually check “retrieve mail on a secure connection”, as many hosts don’t support this option by default. You can choose to label your incoming messages from your particular domain account or any other label you like to help sort and organize your domain email from your regular Gmail. And, if you so desire, you can immediately archive your mail and skip the inbox entirely, though we don’t recommend this unless you’re a power user and know what you’re doing. You wouldn’t want to miss something important; you can always archive it with one-click later on.
- Click “Add Account”.
- Congratulations! You can now retrieve your domain name email using Google. But you probably want to *send* from that account, too, so on the next window, when it prompts you with, “You can now retrieve mail from this account. Would you also like to be able to send mail as [email protected]?” choose YES, I want to be able to send mail as [email protected]. and click “Next Step”.
- The next window will ask you to name this account. This is the name that people will see when they receive email from you, so be sure to name it something appropriate. Your first name, full name or business name are usually acceptable. If you’re going for anonymity, use your blog name or your screen name. It will ask you if you wish to use a different reply-to address, but this is usually not necessary for basic users. Click “Next Step”.
- This is where it can get a little confusing. You have two options: send through Gmails servers or send through SMTP servers (usually your website host’s mailserver). The former is only slightly easier to set up, but you’ll still always have “Gmail” in the received email somewhere, so we recommend using the SMTP option.
- The SMTP information (smtp.yourdomain.com) will most likely already be filled in for you. If your hosts provides you with something different (as discussed in Step Three), use that instead. Again, it’s usually the same as mail.yourdomain.com. Enter your username (same principle applies from above—it’s likely they’ll need your full email address here instead of just the first part) and your email password that you set up in Step Two. Do not check the “Secure Connection” option. Click “Add Account”.
- The next screen alerts you that you’ve been sent a confirmation email to the email account in question, so you’ll need to access the domain name email account using the web host’s control panel or webmail interface just this once. When you get the email, click the confirmation link or copy the confirmation code and paste it into the field in your pop-up window and click “Verify”.
That’s it! Ok, so it seems like a lot of steps, but once you see the ‘wizard’, you’ll see it only takes a few minutes assuming you have all the information you need at the ready.
If you get stuck or you need further trouble shooting, here are some reference links:
- Getting email from other accounts
- Adding a custom ‘From’ address
- Leaving a copy of the retrieved message on the server
- Labels and Filters
We hope this helps! Happy Gmailing!
how-to, gmail, email